Leisure batteries cost money – lots of it
 Surprisingly, many boats have their leisure batteries wired incorrectly. When I say “Incorrectly” I mean that the installation isn’t making best use of the battery bank’s capacity, and worse still, it can actually cause early failure of one or more of your batteries.
Ideally, all of your leisure batteries should be identical, and of the same age. That way, each battery will receive the same amount of charge, and will deliver the same current when it’s called on to do so.
The currents that our batteries sometimes have to pump out might surprise you…..
A kettle running from an inverter can draw around 200amps from your batteries
At these currents, it pays to take care of business. Poor connections or overly long cables reduce the performance of the system dramatically. But the WAY the batteries are connected is important too!
 Now I’m not going to go into the mathematics of this, but suffice to say that batteries aren’t perfect. Batteries possess a characteristic known as “internal resistance”. You can think of this as a small resistor connected in series with the battery. That’s why, when you draw current from a battery, the voltage across it’s terminals drops.
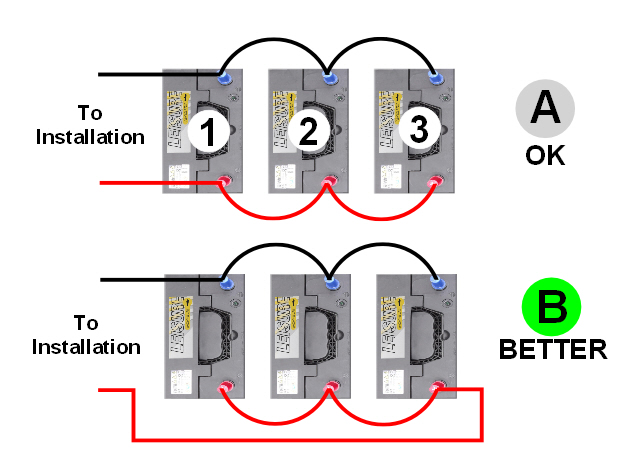
Also, the cables that connect the batteries together – the red & black “loops” in the diagram – possess resistance.
Click Image to Magnify
In the connection layout “A” at the top of the image, current flowing from Battery 3 has to travel through FOUR loops (2 red and 2 black) before it gets to the installation. Those loops each have a resistance, and they combine with the battery’s internal resistance to reduce the current that the battery can deliver.
So, as you’d expect, the battery furthest from the installation delivers least current. Very significantly less, as it happens. On the other hand, the battery CLOSEST to the installation, Battery 1, has to deliver MOST current. So it stands to reason that, because it works harder, it’s life will be shorter.
As for battery 2… well, that’s somewhere in the middle. But, as you can see, all three batteries will be working at different rates. When it’s time to change Battery 1, there may well be a lot of life left in Batteries 2 & 3.
Now we know why one battery often fails first!
Connection diagram “B” is better! That’s because the current is more evenly distributed between the batteries. You’ll notice that the Positive (Red) installation cable is connected to Battery 3, and the negative (Black) installation cable is connected to battery 1. This “evens out” the current draw between the batteries, and so your batteries should last longer and, over time the batteries will “hold up” better, as they’ll be sharing the load. P.S., If you click on the diagram, it’ll expand!!
But hang on… I have four batteries, (or five, or two etc.,). That’s fine. Just use the same connection method. Connect the Positive if the installation to the first battery, and the negative to the last battery. Of course, if it’s more convenient, you can connect the negative to the first battery and the positive to the last. What matters is that the positive & negatives are at opposite ends of the bank.

And as always in these litigious (It wasn’t my fault – Ed told me to do it) times, a disclaimer…. Even though this article describes work to a low voltage system, the currents involved could cause burns, start a fire or cause an explosion. If you are not competent to carry out the work detailed above, please seek the advice of a qualified tradesman.